
First disconnect the battery from the vehicle to prevent sparking wires (If you have a coded Radio make sure you know the code)
Remove the starter from the vehicle.
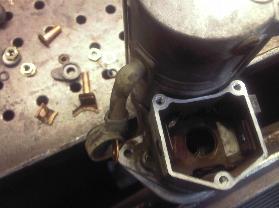
Tools needed to remove solenoid cover:- 7mm or 8mm socket (Depending on model)
First remove the three screws holding the metal cover in place (pictured left)
Remove the starter from the vehicle.
Tools needed to remove solenoid cover:- 7mm or 8mm socket (Depending on model)
First remove the three screws holding the metal cover in place (pictured left)
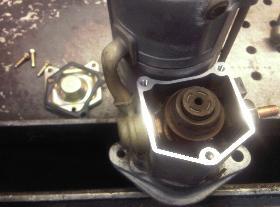
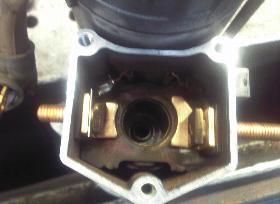
Once the cover is removed you will see the plunger.
Remove the plunger (it just pulls out). You can now see the contacts, these will need to be removed next.
Remove the plunger (it just pulls out). You can now see the contacts, these will need to be removed next.
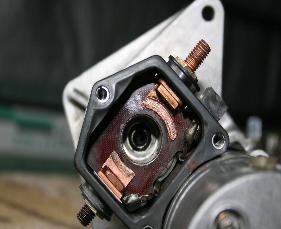
Tools needed to remove contacts :- 12mm or 14mm socket(depending on model)
Pull back rubber boot and undo the nut to remove the lead going from the solenoid to the starter body. You can now undo both nuts holding the contacts in place.
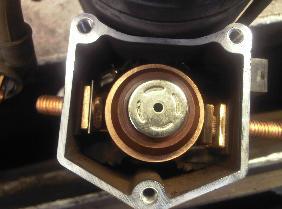
NB:- Please make a note of the order in which you remove the nuts, washers, plastic insulators, O'rings and MOST important which side each contact comes from.
Pull back rubber boot and undo the nut to remove the lead going from the solenoid to the starter body. You can now undo both nuts holding the contacts in place.
NB:- Please make a note of the order in which you remove the nuts, washers, plastic insulators, O'rings and MOST important which side each contact comes from.
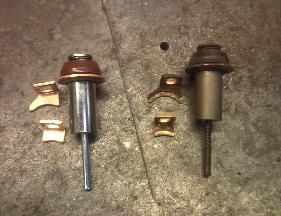
Once the contacts have been removed a check should be made to ensure all the new parts are correct and look the same as those removed.
After the contacts have been removed it's a good time to clean the dirt and dust from inside the solenoid housing.
When the housing is clean the starter can be rebuilt.
When the housing is clean the starter can be rebuilt.
Re-use all the old nuts, washers, plastic insulators, O'rings and bolts.
It is very important you replace the parts in the order they was removed. The small electrical connection coming from inside the solenoid MUST go between the copper bolt and the copper contact (SEE PHOTO)
When the nuts are finally tightened it may lift the edge of the contact, this is not good. Both copper contacts MUST be flat and level or contact life will be greatly reduced.
Before the plunger is replaced make a final check that there is no gap between the head of the bolts and the copper contacts.
The battery terminal bolt has a sirrated base which grips the contact so is a bit harder to tighten.
The battery terminal bolt has a sirrated base which grips the contact so is a bit harder to tighten.

Remember to re-use the plunger spring, the plunger should be very lightly greased before its put back into the housing.
At this point you should be able to press the plunger down so the copper disc makes contact with both new contacts, if all moves smoothly the metal solenoid cover can be replaced (make sure the rubber gasket is in place and seals correctly)
At this point you should be able to press the plunger down so the copper disc makes contact with both new contacts, if all moves smoothly the metal solenoid cover can be replaced (make sure the rubber gasket is in place and seals correctly)
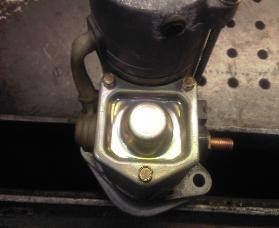
Finally reconnect the lead from the starter body making sure it's not overtightened as it may move the contacts. pull the rubber boot back over the connection so it fits snug as it act as a water seal
The starter should now be ready to put back on the vehicle.
The starter should now be ready to put back on the vehicle.

Download Detailed Installation Instructions
Download Detailed Installation Instructions
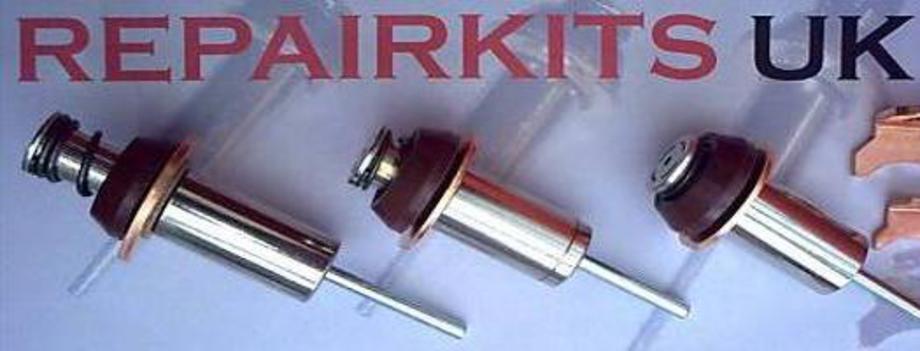
REPAIRKITS+FITTING+INSTRUCTIONS
REPAIRKITS+FITTING+INSTRUCTIONS.pdf
Adobe Acrobat document [164.9 KB]
REPAIRKITS+FITTING+INSTRUCTIONS
REPAIRKITS+FITTING+INSTRUCTIONS.pdf
Adobe Acrobat document [164.9 KB]
We are located at:
RepairkitsUK
Claygate Road
Wimblebury
Cannock
Staffordshire
WS12 2RN
United Kingdom
Contact us today!
If you have any queries
please contact us:
07500 197742 - Mobile
Email - sales@repairkitsuk.com
Or use our contact form.